Showing posts with label clay modeling. Show all posts
Saturday, 20 July 2013
Update | Plugs for mold making back from CNC milling
Tuesday, 14 May 2013
Update | Plugs for mold making
Sunday, 27 January 2013
Update | 3D scanning the body
Over there Nico Velzel of GEOpoints used the flexible hand scanner to translate the clay model geometry into a 3D nurbs model. Using CAD software the body of the motorcycle has been positioned onto the frame to define the exact mid plane. That eased mirroring of the body; to create a perfect symmetric 3D model of the motorcycle. Currently I am checking and smoothening the body in the 3D software before milling out the plugs for the glass fiber mold making. This would most likely take a couple of weeks since I will be working on this great motorcycle only in the evenings and weekends.. End of February I will be at the Motorbeurs in Utrecht, the Netherlands. Which is the largest motorcycle fair in the Netherlands. Over there I will work together with the guys of Star Twin, at the Men @ work area, on technical issues on the bike. A custom stainless steel exhaust manifold will be designed and finally the 4Nol will start for the first time during the fair! More information about GEOpoints http://www.geopoints.nl/
Labels:
3D,
3D scanning,
4nol,
assembly,
body design,
CAD,
clay modeling,
kolb,
motorcycle
Tuesday, 1 January 2013
Update | Sneak preview..
The clay model is finished for 3D scanning, some minor adjustments will be made once modeling in 3D CAD; radii on the edges for example. As you might have noticed, the Spark exhausts are not properly aligned at the moment. The one positioned on the right side it positioned in its final position and the one on the left will be lowered as well to match the other one.
Currently the exhausts are mounted to the frame by bended sheet metal plates; these I used to verify the position of the silencers before milling the final brackets. In the coming weeks the milled headlight and exhaust brackets will arrive!
Labels:
4nol,
assembly,
body design,
café racer,
clay modeling,
ducati,
kolb,
shaping,
spark
Monday, 24 December 2012
Video | Porsche Panamera Sport Turismo - the design process
Wednesday, 19 December 2012
Update | Fuel tank refinement
So we can 3D scan the body early January..
Monday, 26 November 2012
Update | Clay modelling the fuel tank
Thursday, 15 November 2012
Video | Mercedes SLS AMG Black Series
This is an impressive piece of clay modelling!
Thanks to @Autovisie_NL for the tip!
Sunday, 11 November 2012
Update | Body kit anyone?
This weekend I have tweaked the tail section; the flowing line which joins the tank and the tail section together. Also the chamfered surfaces on the lower side of the tail have been smoothened.
The rear part of the fuel tank, just in front of the seat, was slightly modified. I had to add some more clay to establish the smooth fit of the seat. At the moment I need to finish the clay model; cleaning up all the surfaces, apply the radii to the edges of the body and prepare it for 3D scanning.
Since I aim to finish with HD PU milled molds for the motorcycle, I am playing with the thought of preparing body kits fitting a Ducati Monster frame. With a slight modification of the frame, shortening the rear, this kit will fit. So if you have any interest in a body kit to transform your good old Monster into something new, send me an email!
Tuesday, 23 October 2012
Update | a glimpse of the body..
Just a few "spy shots" of the body design. I am progressing slowly with the clay modelling job, due to a lack of time... In the meanwhile I am planning the next steps, towards mold making.
Keep in touch to follow the next phase, soon on this blog!
Monday, 17 September 2012
Update | Trimming the body
Last week I have been shaping the body of the café racer; the mid section of the body has been trimmed. The first set up of the clay model was rather bulk in the mid section and felt uncomfortable while sitting on the bike. The tank section is very slim, creating a comfortable yet dynamic riding position.
For this moment some close-up shops of the motorcycle, the overall view will be given later on.
In the coming weeks the clay model will be prepared for 3D scanning, after which I will design the motorcycle's body in CAD, making use of the 3D data generate by the scan. This allows my to prepare the molds in CAD as well, so these can be milled out of HD PU foam.
Even so this offers the possibility to manufacture multiple bodies in the molds instead of one! So last weeks I am playing with the thought to develop a small body-kit serie; if some people are interested in a unique kit fitting a Ducati Monster frame.
Wednesday, 29 August 2012
Update | Fitting the bike
Finally! This week I was able to sit on my café racer for the first time! It was a very pleasant “ride” as you can see on the picture below.
The Spark exhausts will be positioned a little bit backwards. The current position is not the final one, due to a connector I need to bend to fit the silencers to the manifold.
The automotive tape is applied on the clay body this week! This is such a great tool to check out lines on the body of the motorcycle and the planned transition of one surface into the other.
On the second photo you’ll see the two black lines of tape positioned lower than in the last two photos’. I have lifted the lower part of the fuel tank a little bit, to give motorcycle a more aggressive and agile feel.
The coming weeks the volume and surfaces of the café racer will be tweaked further.. Stay tuned!
Saturday, 25 August 2012
Update | Tweaking the main volume of the body
It has been a short while since my last blog post about the bike build. I have been more busy building and shaping than blogging, so I will make it up this weekend with more posts than regular.
A week and a half ago I have been tweaking the main volume of the clay model. First the tank area has been shaped with a big rasp to create its rough shape. After that I have used Kolb slicks (spring metal strips) to smoothen the surfaces of the tank.
Similar to the tank area I used the slicks to smoothen the rear end surfaces of the motorcycle, for the time being.. because from now on the refinement starts; trimming and optimizing the motorcycle’s volume, lines and surfaces.
Wednesday, 15 August 2012
Update | start clay modeling
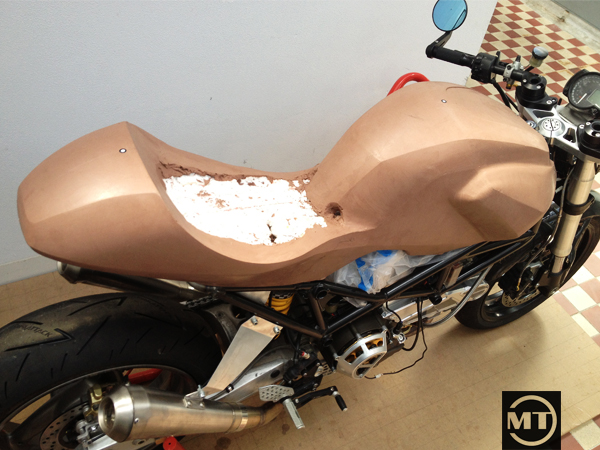
The clay modeling finally started! The polystyrene core was already mounted on the frame, but last week I added the Kolb automotive styling clay onto the polystyrene. Smudging the 60 degree clay on the body is a hot and time consuming job, but once the clay is on the real shaping starts!
These pictures show the clay modeling preparations, the coming weeks more shots of the clay modeling will appear on this blog! Keep in touch..
Subscribe to:
Posts (Atom)


